Quick answer
To measure cabinet pulls for replacement, record the distance from the center of one existing screw hole to the center of the other. Match that center-to-center dimension to the replacement’s specification. Then check its base size, overall length, projection, and screws before buying a full set.
Keep the measurement in millimeters as well as inches. Exactly 5 inches is 127 mm, not 128 mm. A rounded shopping label is not enough to confirm a match.
This guide covers ordinary two-hole cabinet and drawer pulls. Single-hole knobs have a different fit check, explained below. Appliance handles, recessed pulls, and edge-mounted hardware need their own installation instructions.
Replacing the drawer hardware as well? Use our drawer-slide measurement guide to check the slide length, mounting type, and clearance separately from the handle-hole spacing.
Which cabinet pull measurement matters?
Center-to-center, also called C-C, CC, CTC, or hole spacing, is the distance between the two mounting-hole centers. Overall length is the full end-to-end length of the handle. Two pulls can share the same hole spacing and still look very different.
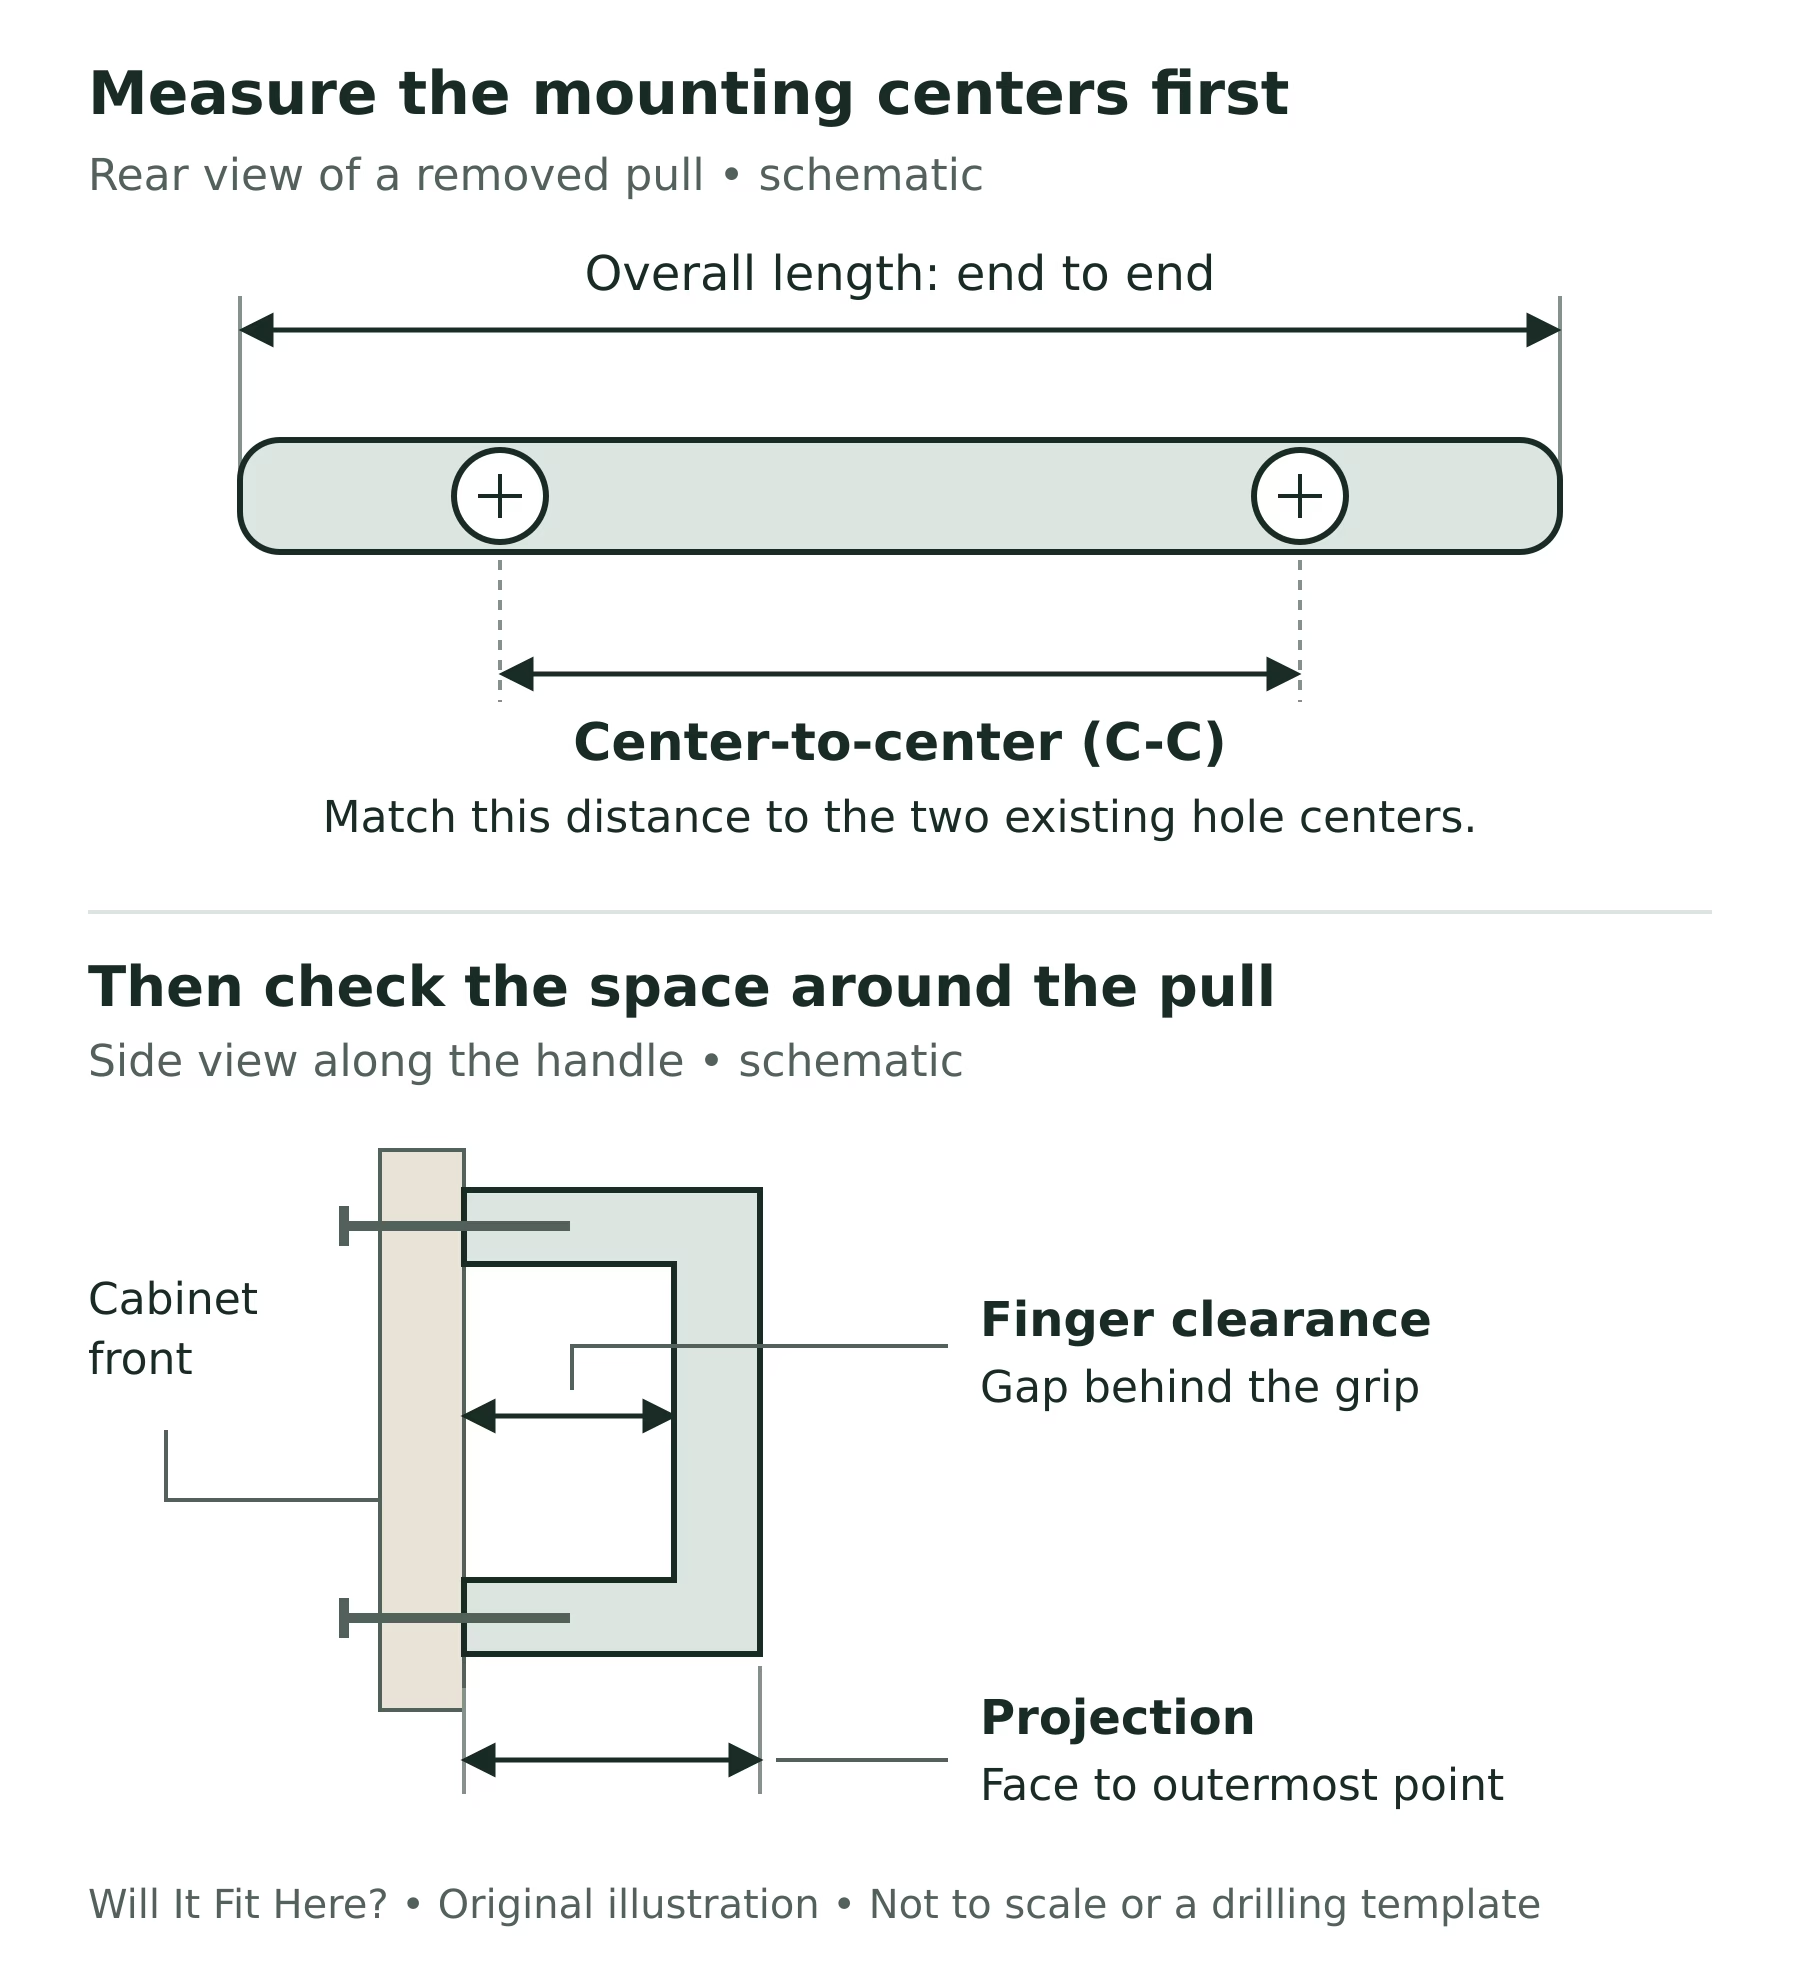
| Measurement | What to check |
|---|---|
| Center-to-center | Existing hole centers must line up with the replacement’s mounting centers. |
| Overall length and width | The full handle must fit on the front without hitting trim or neighboring hardware. |
| Base footprint | The areas touching the cabinet should cover old marks if you want to avoid refinishing. |
| Projection and finger clearance | Check outward reach, usable grip space, and clearance as doors and drawers open. |
| Front thickness and screws | Measure the material the screw passes through; confirm the new pull’s thread and required screw length. |
For a real specification example, the Amerock Riva BP55367PN lists 128 mm center-to-center, 144 mm overall length, and 32 mm projection. Its corresponding inch labels are 5-1/16, 5-11/16, and 1-1/4 inches. These are the manufacturer’s rounded labels, not exact mathematical conversions. Measuring the 144 mm handle length would give you the wrong number for matching its holes.
How to measure cabinet pulls using the existing holes
You’ll need a screwdriver that fits the screws, a rigid ruler with millimeter markings, and somewhere to record the measurements. A caliper can help when a reading is close to two possible sizes.
- Remove one pull carefully. Open the door or drawer, support the handle with one hand, and loosen its screws from the back. Keep the handle and screws together. If the finish is stuck to the base, don’t pry against it.
- Measure center to center. Lay the ruler flat across the holes and look straight down at the markings. Measure along the line joining their centers, even if the holes are slightly crooked. Record what you can actually read, rather than rounding to a size you expect.
- Cross-check the old pull. Measure between the centers of its threaded mounting holes. If the cabinet holes are worn, enlarged, or difficult to read, this gives you a second reference. A disagreement needs another look before ordering.
- Check the rest of the cabinets. Record spacing for each different door or drawer type, then verify the remaining holes before committing to a full order. Similar-looking handles can have different mounting dimensions.
If the centers are hard to judge, measure from the left edge of one clean, circular hole to the left edge of the other. This equals center-to-center only when the holes are the same diameter. Measuring between the two nearest edges gives a smaller number. For damaged or unequal holes, use the removed hardware and ask the manufacturer or an installer to help confirm the fit.
Berenson’s replacement instructions likewise start with the current pull’s center-to-center measurement, then use that dimension to select replacement hardware.
Common hole spacings and the inch-conversion trap
Use this table to recognize dimensions you may encounter, not to round an uncertain measurement into a match. The precise specification for your chosen size and model takes priority over a category name such as “5-inch pulls.”
| Specified spacing | Conversion | How to use it |
|---|---|---|
| 3 inches | 76.2 mm exactly | Check whether a “76 mm” listing is using a rounded label. |
| 96 mm | About 3.7795 inches | Keep 96 mm as the comparison dimension. |
| 4 inches | 101.6 mm exactly | Do not substitute 96 mm. |
| 5 inches | 127 mm exactly | Do not assume it means 128 mm. |
| 128 mm | About 5.0394 inches | Often labeled 5-1/16 inches; verify the metric specification. |
| 160 mm | About 6.2992 inches | May carry a rounded 6-5/16-inch label. |
| 192 mm | About 7.5591 inches | May carry a rounded 7-9/16-inch label. |
Conversions above are calculated using 25.4 mm per inch; decimal inch values are rounded to four places. Berenson’s center-to-center chart shows several of these size labels, including 128 mm / 5-1/16 inches. A fractional retail label can describe a metric product without being an exact conversion.
Worked example: 5 inches versus 128 mm
Suppose your existing hole centers are measured accurately at 5.000 inches. That is 127.0 mm. A proposed 128 mm pull has mounting centers 1.0 mm farther apart.
That arithmetic does not establish whether the hardware will fit your particular holes. Hole clearance, fasteners, and measurement uncertainty matter. Remeasure in millimeters, check the exact product drawing, and try one sample without forcing it. There is no universal acceptable mismatch to rely on. If you cannot confirm alignment, choose another pull.
This is a calculated example, not a hands-on fit test.
Check the screws and cabinet-front thickness
Matching hole spacing gets the mounting points in the right places. The screws still need to fit the new handle and clamp it securely.
- Confirm the thread. Don’t assume the old screws fit the new pull. For example, #8-32 and M4 are different specifications. Berenson’s screw guide lists different threads for different hardware, including 8-32, M4, and 10-24.
- Measure the full material thickness at the screw location. On some drawers, the screw passes through both a decorative front and the drawer box. A measurement at an unrelated edge may miss that second layer or a recess.
- Use the product’s length and engagement requirements. The screw must reach far enough into the pull to hold it, without bottoming out before the base seats. There is no single extra length that works for every handle.
The Riva example above includes #8-32 machine screws in 1-inch and 1-1/2-inch lengths. That does not make either length right for every cabinet. Confirm the needed length for your front and the pull’s threaded depth; ask the maker when those details are unclear.
Check coverage and clearance before ordering a set
With the old pull removed, look for dents, finish differences, and paint outlines around its bases. Compare those areas with the replacement’s base footprint. A longer handle with tiny feet can leave the old marks visible.
Next, compare the new handle’s projection with nearby walls, appliances, and other handles. Check the path of the door through its opening arc and the drawer through its normal travel. Corner cabinets deserve particular attention. Leave enough space for your hand behind the grip, too: overall projection includes the handle itself, so it is not the same as finger clearance.
Try one sample on a representative front before purchasing the whole set. Start both screws loosely and by hand, following the maker’s instructions. Stop if the second screw will not line up or either screw binds. Don’t use a power driver to pull a mismatch into place. Once properly installed, check the grip and open the neighboring doors and drawers slowly.
What if the replacement does not fit?
- One screw fits but the other misses: recheck center-to-center spacing and make sure both screws were started loosely. Do not bend the pull or enlarge the holes to force a no-redrill swap.
- The screw feels tight but the handle is loose: it may be bottoming out, have the wrong thread, or be meeting damaged threads. Stop and verify the fasteners rather than tightening harder.
- The new bases expose old marks: look for a same-spacing pull with larger bases or a compatible backplate. A backplate can cover marks; it does not automatically adapt different hole spacing.
- The spacing is unusual: search by the measured dimension and ask the cabinet or hardware maker. An adjustable or multi-mount pull is another option only if its documented range or mounting positions include your holes.
- No compatible hardware is available: filling, refinishing, and drilling new holes is a separate project. Decide whether that work is worthwhile before buying an incompatible set.
Replacing knobs instead of pulls
A typical single-hole knob has no center-to-center dimension. Check the existing hole, the new knob’s mounting method and thread, screw length, base coverage, and clearance. Switching from a single-hole knob to a two-hole pull usually requires another hole; a long-looking single-post handle is a different mounting design. Check its instructions rather than assuming its shape tells you how it attaches.
Before-buy checklist
- I have recorded the existing hole spacing in millimeters and inches.
- The exact replacement model lists matching mounting centers, not just a similar overall length.
- I have checked every size group and any unusually placed or damaged holes.
- The bases cover the old marks, or I have a plan for the exposed finish.
- The handle clears neighboring surfaces and feels comfortable to grip.
- The screw thread, length, and engagement suit the new pull and the full front thickness.
- I have checked the return policy and will confirm one sample before ordering the full quantity.
The best next step: remove one pull, write down its hole spacing, and shop using that measurement. Confirm the complete fit with one sample before replacing the rest.
Sources and how this guide was prepared
This guide uses manufacturer specifications and original explanatory drawings. We have not physically tested the products mentioned. Product information was checked on October 4, 2026; verify the current instructions for the exact item you buy.