Quick answer
To measure drawer slides for replacement, identify the mounting type and model first, then record the fully closed slide length, drawer-box depth, usable cabinet depth, and clearance on each side. Compare those measurements with the exact replacement’s installation drawing, including its brackets, screws, and retaining parts.
A label such as “20-inch slide” does not confirm interchangeability. Neither does a rule that every side-mount slide needs 1/2 inch (12.7 mm) of space. The chosen model’s requirements decide the fit.
Identify the slide before measuring
Empty the drawer and photograph the hardware while it is still installed: both sides, the underside, the cabinet front, and the rear attachment. Look for a stamped brand, model number, suffix, or part label. Record left- and right-hand markings, too.
Support the drawer before releasing it, and use its actual disconnect instructions. Get help with a heavy drawer, keep fingers clear of telescoping members, and stop if you cannot identify the release. Some drawers lift off; others have levers or underside clips. Pulling harder is not a reliable removal method.
- Side-mount: hardware runs along both drawer sides. Note whether it uses rollers or telescoping ball-bearing members.
- Concealed undermount: runners sit beneath the drawer, often with front locking devices and rear engagement points. Drawer construction is part of the fit.
- Center-mount: a single central guide or slide runs underneath. Match that system’s profile and supports rather than applying a side-mount clearance rule.
Also record whether the cabinet has a front face frame or frameless construction, and whether the drawer front sits inside the opening or overlays it. These details affect the mounting plane, setback, and support hardware. The KV replacement instructions explicitly require checking mounting style, load, length, and available clearance.
Measure five separate parts of the fit
Use a rigid ruler or tape with inch and metric markings, a light, and a notebook. Record the reading you can actually measure. If a result is close to the product’s tolerance, remeasure with a finer tool rather than rounding into a fit.
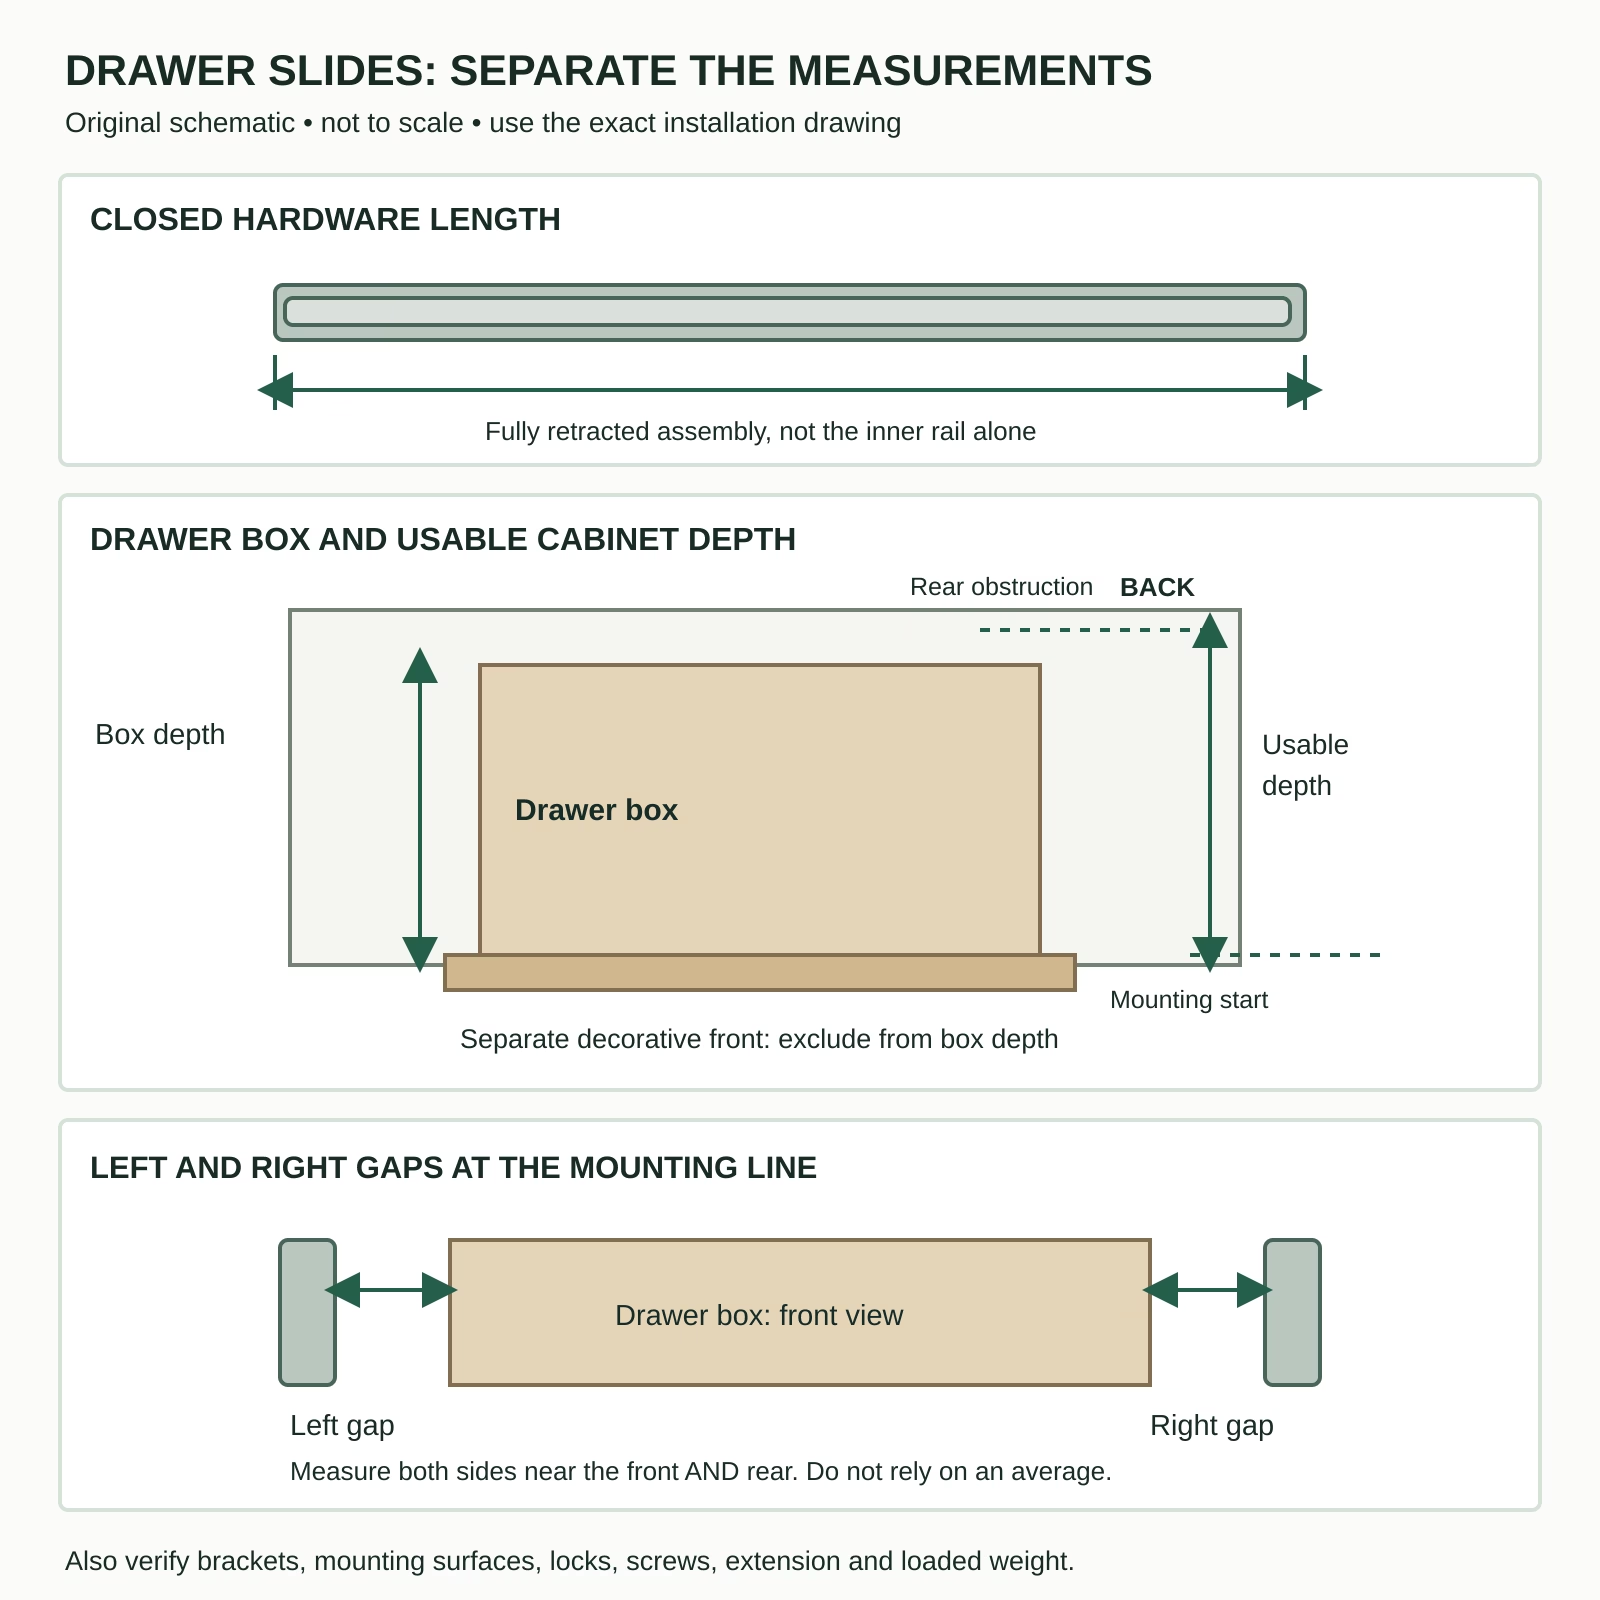
- Closed slide length. Measure the complete slide in its fully retracted position from its specified front to rear reference points. Do not measure only the removable inner rail or the fully extended assembly. Note any protruding hardware separately and compare with the product drawing.
- Drawer-box depth. Measure the outside box from front to back, excluding a separate decorative front. Record front construction if it is integral or unusual.
- Usable cabinet depth. Measure along the proposed slide line from the required front mounting position to the first rear obstruction. A face frame, back panel, pipe, screw, or rear bracket can reduce the space. Follow the drawing’s setback and rear-support dimensions; do not subtract a generic allowance.
- Left and right side gaps. Record each gap between the box and its actual mounting surface. Check near the front and rear. Measuring only the clear opening may miss a recessed side wall or spacer behind a face frame.
- Attachment geometry. Record the height of the slide line, front setback, rear support, and available mounting surfaces. Existing screw holes need their own comparison; matching length does not guarantee matching holes.
If the cabinet narrows, twists, or has a loose support, one average measurement will hide the problem. Photograph and record it before choosing hardware.
Nominal length, actual length, and extension
A slide’s shopping size, its closed physical length, and its opening travel answer different questions. Check all three when a drawer must clear a countertop, door, or obstruction.
| Product | Listed closed length | What it demonstrates |
|---|---|---|
| KV 8400B 20 | 20 inches / 508 mm | Its size and length columns agree. |
| Accuride 7432-20 | 19.69 inches / 500 mm | A 20-inch size designation can describe a shorter physical slide. |
Sources: KV 8400 specification, page 2 and Accuride 7432/7434 specification, page 1. The inch/mm pairs are the manufacturers’ published values; 19.69 inches is a rounded equivalent of 500 mm. These products have different mounting details and are not established replacements for each other.
Extension describes how far the drawer opens: partial extension leaves more of it inside; full extension and over-travel provide progressively greater access. Read the actual travel value when clearance matters. Accuride’s ordering checklist treats travel, load, side space, and mounting as separate choices.
Do not automatically round an odd drawer measurement down to the next stocked length. First ask whether the exact candidate supports that box depth, cabinet space, and rear attachment. This is especially important for undermount runners.
Check each side, not just the total gap
For a simple parallel side-mount layout, subtract the drawer’s outside width from the distance between its two mounting surfaces. This gives the combined available gap. Dividing by two gives an average only; it does not prove that both sides have that clearance.
Calculated rejection example
Suppose the mounting surfaces are 18 inches (457.2 mm) apart, and the drawer box is 17-1/4 inches (438.15 mm) wide. The total gap is 3/4 inch (19.05 mm). If centered, that leaves 3/8 inch (9.525 mm) per side.
The KV 8400 sheet specifies 0.50 inch +0.03/−0 on each side, also shown as 12.7 mm +0.8/−0. This hypothetical drawer lacks the required space for that model. Even perfect centering cannot supply its two minimum half-inch gaps. This is arithmetic, not a physical test.
The same sheet’s fractional and metric tolerances are rounded representations. Keep the native specification and ask KV about a borderline measurement rather than treating converted decimals as new manufacturing limits.
If the gap fails, stop that candidate’s fit check. This guide does not recommend shaving the drawer, improvising spacers, or mounting a side slide flat. Such changes need an approved installation plan for the particular hardware and furniture.
Undermounts need a drawer-construction check
For a concealed runner, collect the drawer-side thickness, bottom recess, box length and width, rear notches, hook-hole geometry, and locking-device part numbers. A runner with the same advertised length can still require a different drawer.
For example, Blum’s 2025 R001/R002 TANDEM plus BLUMOTION kit instructions specify their own drawer dimensions, rear preparation, and left/right locking devices. Their requirements belong to those kits, not to every Blum product or every undermount slide.
Compare the complete drawing for your exact family and size with the existing drawer. If the runner matches but the locks or rear hooks do not, the replacement is still unconfirmed. Do not mix old and new members, clips, or brackets unless the manufacturer explicitly approves that combination.
Changing from side-mount to undermount is a conversion project. The existing box may need different dimensions and preparation. Treat it separately from a like-for-like replacement rather than ordering concealed runners on length alone.
Use this before-ordering worksheet
| Check | Existing drawer/cabinet | Proposed replacement |
|---|---|---|
| Identity | Brand, model, suffix, mount type | Exact SKU and current instructions |
| Depth | Closed slide, box depth, usable cabinet depth | Actual length, setback, rear allowance |
| Clearance | Left/right gaps at front and rear | Required gap and tolerance |
| Attachments | Frame, supports, hole locations, material condition | Approved screws, brackets, locks and rails |
| Drawer construction | Width, side thickness, underside and rear geometry | Permitted dimensions and preparation |
| Use | Drawer plus contents; required opening travel | Rated load, width limit, travel and mounting conditions |
The weight to compare is the drawer plus everything it carries. A headline load rating cannot confirm suitability without the maker’s drawer-width and installation conditions. Keep the hardware as its approved set and check what the package includes before ordering.
Proceed only when every necessary dimension and component is confirmed. For an unknown model, send the manufacturer photos and this worksheet. For damaged wood, loose brackets, or a drawer carrying unusually heavy loads, have an installer assess the mounting structure.
Common replacement questions
Can I reuse the existing screw holes?
Only if their locations, screw specification, and material condition meet the new slide’s instructions. A reused hole that no longer holds securely is not a confirmed attachment point.
Can I replace only one slide or inner rail?
Use the replacement arrangement the manufacturer approves. Visual similarity does not establish that old and new telescoping members, bearings, or retaining parts work together.
Does soft-close make a slide interchangeable?
No. Soft-close describes a feature. The replacement still needs the correct length, mounting envelope, clearance, attachments, and drawer construction.
What if it binds after installation?
Stop using it and check the exact instructions, alignment, gaps, and fastening. Do not force the drawer or load it to “break in” a suspected mismatch. Seek help if the mounting structure or hardware identity is uncertain.
Sources and measurement notes
- Knape & Vogt 8400 specification, OL2806/1119: model-specific dimensions and clearance.
- KV 8400/8405/8407/8409 installation sheet: replacement and mounting checks.
- Accuride 7432/7434 technical sheet: actual length versus travel and rail system.
- Accuride order checklist: load, extension, mounting, and side space.
- Blum R001/R002 kit instructions: concealed-runner construction requirements.
Sources checked October 4, 2026. Measurements and product examples concern US-market documentation. Original illustration and calculated example; no hands-on product test is claimed. One inch equals 25.4 mm.