Quick answer: Microwave cabinet fit for an over-the-range replacement depends on the exact cabinet opening, mounting height, cabinet depth, approved support and ventilation route. A similar exterior width does not establish compatibility with old brackets or holes. Compare the new model’s installation drawing and templates before ordering or scheduling installation.
This guide is for replacing an over-the-range microwave below an upper cabinet or planning one during a kitchen update. It helps you collect the measurements and compatibility questions an installer needs. It does not provide drilling, anchoring, lifting or electrical instructions for a heavy appliance above a cooking surface.
1. Start the microwave cabinet fit check with the exact model
Copy the full model number of the proposed microwave, including its suffix. Download the manufacturer’s installation manual, rear-wall template and top-cabinet template where provided. Record the range or cooktop model too; physical clearance and permission to install above that appliance must both be checked.
A listing’s overall width describes the body, while the installation drawing defines the opening and mounting arrangement. A replacement may have a similar face width but a different top attachment pattern, rear mounting plate or vent position. Treat the old appliance as a measurement reference rather than proof of an approved replacement.
If a used unit lacks its specified mounting parts or templates, identify the approved replacements before buying it. A paper template from a different model is not a substitute simply because the outlines look close. Do not use a reduced or enlarged printed template; obtain the correct manufacturer version and follow its scale-check instructions if supplied.
2. Measure microwave cabinet fit from the correct reference points
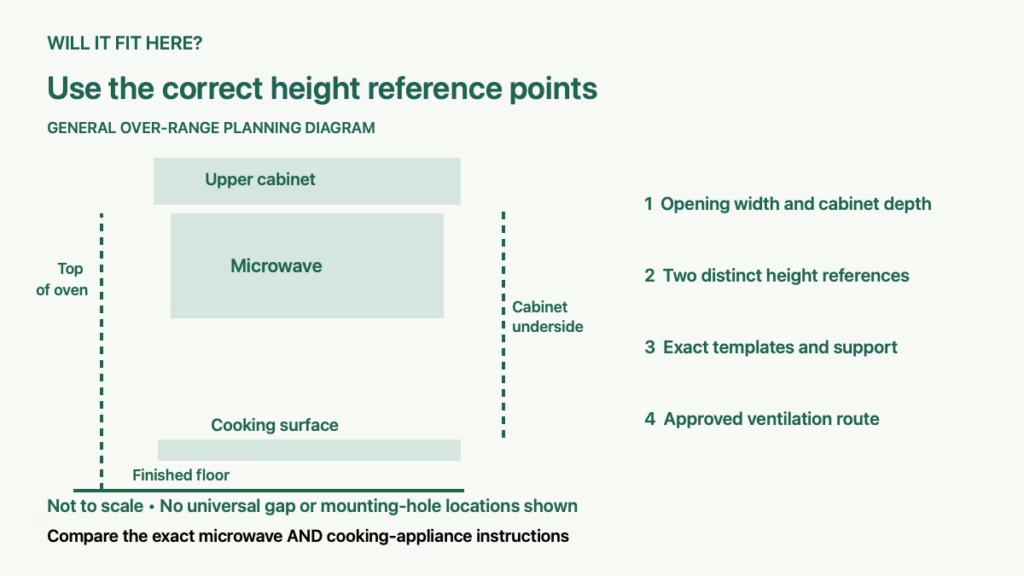
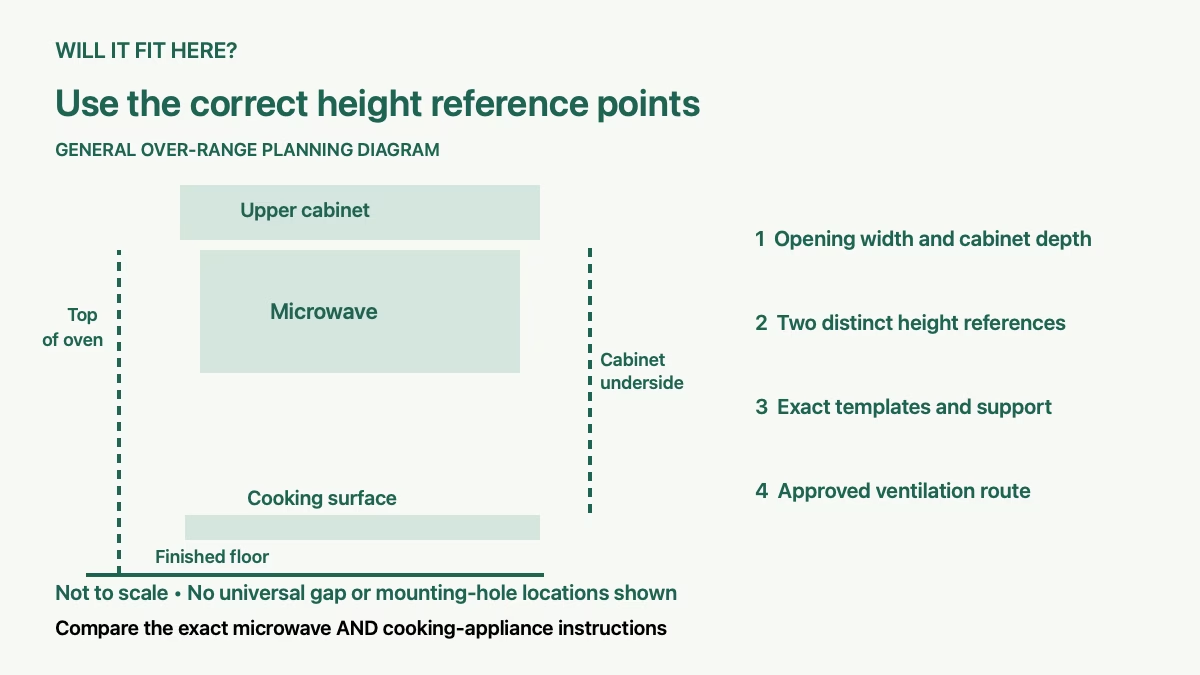
Measure the unobstructed space between the cabinet sides, the depth of the upper cabinet and the distance from the cooking surface to the underside of that cabinet. Separately record the floor-to-microwave-top height required by the selected instructions. Mark the reference points on a photo so “height above the range” cannot mean two different things.
As a model-specific example, the GE installation document linked from the JVM3160RFSS owner page specifies a 30-inch unobstructed cabinet opening. Its diagram calls for at least 30 inches from the cooking surface to the cabinet’s bottom edge, and at least 66 inches from the floor to the oven’s top. These are distinct measurements. They are not a universal clearance rule for every microwave and cooking appliance.
Check any cabinet face frame, underside recess, projecting trim and backsplash. Record both the main cabinet depth and the lowest obstruction. A tape measurement across the cabinet front can conceal a narrower space behind it or a rail below the flat bottom panel.
Keep the model’s required reference dimensions separate from the remaining gap below the installed microwave. Do not replace a manual requirement with an assumed generic gap between the microwave bottom and cooktop.
3. Check microwave cabinet fit beyond the visible opening
Compare the cabinet bottom’s shape with the specified mounting arrangement. A recessed underside or projecting front rail can affect how the appliance seats and where the installer needs the approved spacing components. Let the exact template and instructions resolve that geometry.
The GE document uses a 13-inch maximum cabinet depth for standard installation and identifies a separate JX15BUMPWW/BB installation kit for a 15-inch-deep cabinet arrangement. That exception belongs to the applicable GE instructions. Do not improvise a spacer or transfer this allowance to another manufacturer’s microwave.
Check the handle and door swing against an adjacent wall or projecting cabinet. Mark their movement on your kitchen plan without holding a heavy appliance in place. The face can fit neatly between cabinets while its opening motion conflicts with a nearby return wall.
Also consider the working position. Controls and the interior may be difficult to reach at a permitted mounting height. Decide whether an approved alternative appliance location would suit the user better before committing to an over-the-range configuration.
4. Resolve the support and ventilation arrangement
For your microwave cabinet fit assessment, have the installer compare the new rear-wall and top-cabinet templates with the existing installation. The selected GE instructions require both wall and top-cabinet mounting. Old screw holes and a retained plate do not establish compatibility or adequate support for a different appliance.
Record whether the planned configuration recirculates into the room or exhausts outdoors. Compare the proposed vent outlet and duct route with the exact model’s supported configurations. A matching cabinet opening does not guarantee that an existing roof or rear-wall duct meets the new instructions.
Keep required airflow paths clear. An upper trim panel or deep cabinet can conflict with an outlet even if it makes the face look flush. Ask the installer to review the complete ventilation plan and any necessary approved accessory before installation.
Use a qualified installer to assess support, handle the appliance and complete mounting. Electrical work belongs to a qualified electrician. The GE instructions prohibit extension-cord use and require an electrician’s grounding check; a cord that does not reach is a service-location issue to resolve properly.
5. Document microwave cabinet fit before replacement day
Create a record with the microwave and cooking-appliance model numbers, the exact manual revision, opening width, cabinet depth, both height references, underside profile and planned ventilation configuration. Add photos of the existing mounting area that are safely visible and list anything concealed by the old unit.
Arrange for the installer to confirm concealed support and service details during safe removal. Do not promise reuse of existing hardware in advance. If cabinetry or services must change, establish the approved plan and responsibility for that work before the new microwave arrives.
Approve the replacement only when the dimensions, supported cooking-appliance pairing, mounting system, electrical location and ventilation all agree. That combined check prevents a correct-width purchase from becoming an unresolved installation project.
Questions about over-the-range replacements
Can I reuse the old wall bracket? Only when the new model’s manufacturer expressly approves that part and installation arrangement.
Is overall width enough to shop for a replacement? No. Verify opening, heights, depth, support and ventilation with the exact instructions.
Can a deeper cabinet be handled with any spacer? Use only a manufacturer-approved arrangement for the exact model. Ask the installer to confirm the cabinet profile.
Sources and related installation checks
Source checked October 6, 2026: GE JVM3160RFSS owner installation page, linking to installation instructions 31-7000341 Rev. 0, April 2026 (mounting-space diagram on page 6). Use your own model’s current instructions. For lower-cabinet replacement planning, see dishwasher opening checks and our measurement guides.