Quick answer: Curtain rod projection must put the moving curtain fabric in front of the deepest part of the existing blind, trim or handle. Measure from the wall where the bracket mounts to that obstruction, then compare it with the approved rod position and the fabric’s space behind the rod. A bracket’s overall length or package size does not establish that clearance.
This guide is for adding curtains over an outside-mount blind, layering a sheer and a blackout curtain, or replacing brackets that let the fabric drag against a valance. The problem is front-to-back fit. Rod length across the window is a separate check, and a longer rod will not solve inadequate projection.
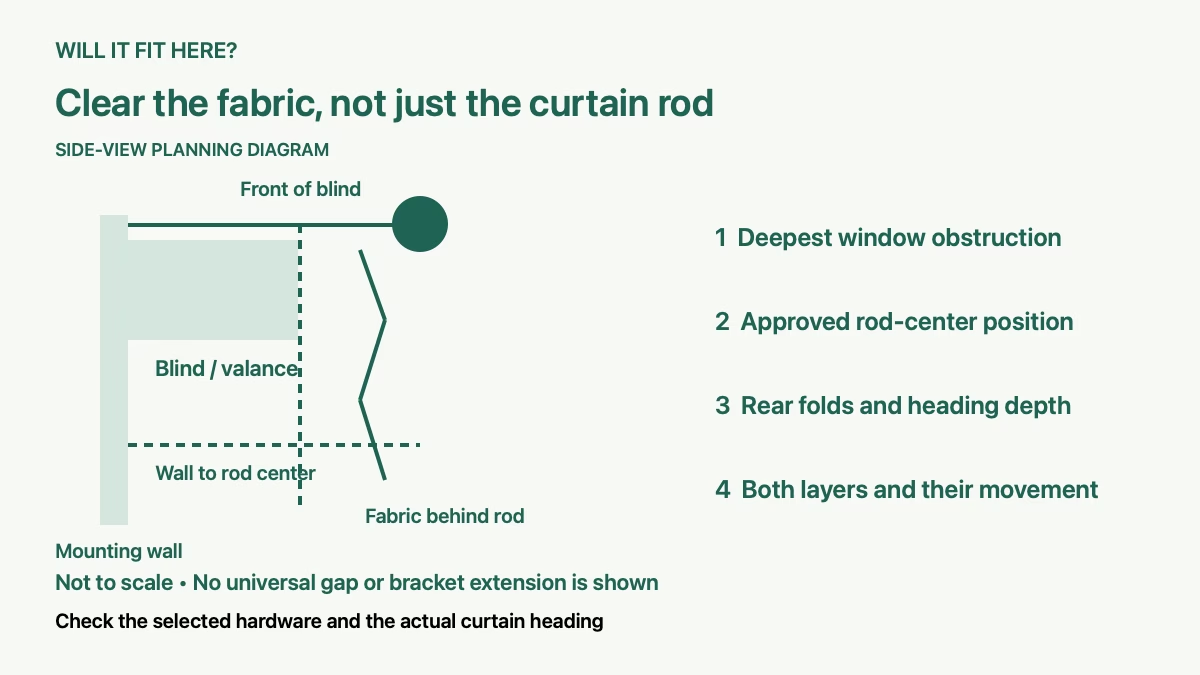
1. Measure curtain rod projection from the mounting wall
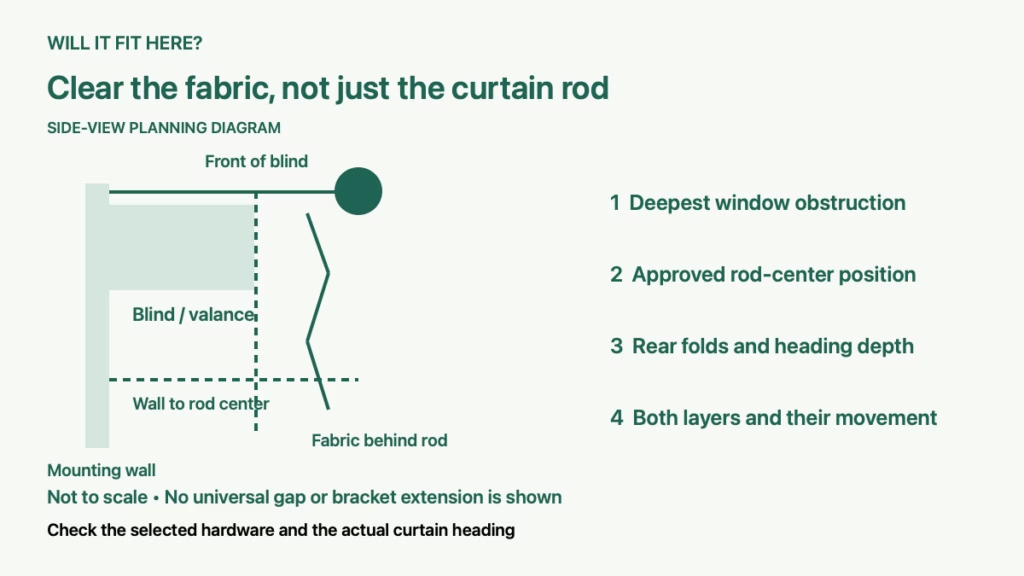
Use one reference plane: the wall surface where the bracket base will attach. Measure outward to the front of the blind’s headrail, valance, trim and any handle. Record the largest projection that overlaps the proposed curtain path. A blind can look shallow when lowered yet have a bulky headrail at the top.
Repeat the check across the opening. A decorative trim block or an offset handle may project farther than the center of the window. Operate the blind and window normally while observing the area the curtain must occupy; do not judge clearance from one closed position.
A useful side-view sketch has three marks: mounting wall, front of obstruction, and proposed rod center. Add the fabric behind that center rather than representing the curtain as a line through the rod. This prevents a common mistake: clearing the rod while leaving the curtain pressed against the blind.
2. Compare the usable curtain rod projection
For curtain rod projection, find the bracket drawing and identify what its stated projection measures. It might describe the rod center, the outer edge of the holder or the bracket’s total length. Compare like measurements. Ask the seller for the wall-to-rod-center dimension if the listing leaves that unclear.
For an adjustable bracket, use only the positions permitted by its instructions. Confirm that the actual rod diameter fits the holder and that the bracket can lock at the selected position. Extending an adjustment farther than designed is not a way to gain clearance.
As a specific hardware example, IKEA’s BETYDLIG bracket, article 602.172.28, allows the rod holder to be positioned closer to or farther from the window. IKEA specifies the thick anti-slip liner for RÄCKA rods and the thin liner for HUGAD rods. Those compatibility details concern this system; they do not establish an extension range for other brackets. The page’s packaging dimensions are not installed projection measurements.
3. Check curtain rod projection with the actual heading
Grommets, rings, tabs and pleated headings place the fabric differently around the rod. Look at the assembled heading, including the portion that sits behind the rod center. A thick interlining or deep fold can occupy more space than a thin sheer.
Temporarily hold a sample or the actual heading at the proposed rod position without attaching anything to the wall. Open and gather it as you would in everyday use. Check whether the back folds rub against the valance or catch the blind controls. This is a fit observation, not a mounting test.
For example, a rod may pass in front of a projecting blind while a grommet curtain curls behind it and touches the headrail. The remedy is an approved configuration with adequate fabric clearance, a different heading or a revised window treatment. Buying a wider curtain does not move that rear fold forward.
4. Check curtain rod projection with two layers
Plan the rear and front rods separately. The rear sheer must clear the blind, and the front curtain must clear the sheer when both are gathered. Record each rod center and the occupied fabric space, including rings or other hanging hardware. Do not simply double a single-layer projection number.
IKEA describes additional BETYDLIG rod holders for double- or triple-layer arrangements, sold separately. Use the compatible parts and approved arrangement for that system. Adding a second generic holder to a bracket does not automatically make it suitable for the extra load or the intended rod positions.
Check the sides as well as the middle. Finials can meet a return wall, and gathered fabric can block a window handle even when the rods themselves clear. Draw where the curtains will stack when open so you can preserve access to the blind controls.
5. Confirm support before fixing the final position
Projection and secure mounting are separate requirements. Moving fabric farther from the wall changes how the assembly occupies the room; it does not prove that the wall or existing holes can support it. Use the exact bracket and rod instructions for support spacing, permitted curtain load and fasteners.
The BETYDLIG instructions require fasteners suitable for the particular wall or ceiling; those fasteners are not included. Have an installer identify the substrate and appropriate fastening when uncertain. Do not use this measurement guide to choose substitute anchors or to reuse unknown old fixings.
Before ordering, keep the wall-to-obstruction measurement, selected rod-center position, heading type, number of layers and bracket identifiers together. If the required projection exceeds the permitted arrangement, resolve the design before drilling. An approved ceiling-mounted system may be an option, but it needs its own mounting and movement checks.
Questions when curtains drag against blinds
Is there one standard projection for every blind? No. Measure the actual blind and fabric arrangement, then compare it with the selected hardware’s drawing.
Can I use spacers behind the bracket? Only if the manufacturer approves that configuration and its fastening. A homemade offset is not verified by this fit check.
Will a longer rod fix the problem? It can change side coverage or stacking space, but it does not increase front-to-back clearance.
Sources and related window checks
Sources checked October 6, 2026: IKEA BETYDLIG product and compatibility details and official BETYDLIG assembly instructions. For a shade inside the opening, see our roller shade depth guide. For another window accessory that needs connected clearance, see the portable AC window kit checks.